Showing posts with label Costumes. Show all posts

Thursday, October 27, 2011

Owl costume

I finally finished my son's owl costume! Let me just say, designing a costume for a two-year-old is not my favorite thing, especially when that two-year-old tantrumed every time I attempted a fitting. But seeing my little man in it made it all worth it! Earlier I came across a little owl bank from Urban Outfitters on Pinterest and used it for my inspiration as I made my own flannel version.When it was all said and done, I think even my costume-hating son liked it since he proudly paraded it around for the rest of the night. I am now fully convinced that Halloween was made for mothers.


The leggings were made out of an old orange and white striped polo t-shirt that I died yellow and then made into matching pants. Here is how I made them.

Monday, October 24, 2011

Fox Costume

  Earlier this Summer, My oldest son told me that he wanted to be Batman for Halloween. Since I was hoping to do a woodland theme this year with my three boys, I made him a quick Batman (here) costume in hopes that it would satisfy his superhero needs. Since then, I have been trying to change his mind by having him watch old episodes of David the Gnome on Youtube and telling him that fox's get the most candy when trick-or-treating. Some would say that this is slightly dishonest, but since this is probably the last year that I can pull this trick, I feel completely justified! To make our fox costume come true, we died our fabric orange, made up a fox pattern and crossed our fingers in hopes for the best. I just finished it today and am thrilled. I was a little worried that I bullied him into it until I watched him race happily around for the rest of the day and hearing him say, "I want to wear this costume forever!" Needless to say, I am pleased as punch and would recommend poisoning molding your child's mind with the help of David the Gnome to anyone. Now just one owl costume to go and we'll be set!


Wednesday, October 19, 2011

Hedgehog Costume

Forgive me for putting his face make-up on after I took the pictures....how could I have forgotten that every self-respecting hedgehog has a little shiny nose and whiskers.
This year I decided that my littlest man HAD to be a hedgehog for Halloween. There is something about his cute little upturned nose and sticky-outy ears that remind me so much of the endearing hedgehog that I just couldn't picture it any other way. With a little (or a lot) of felt and some anti-pill fleece, his snugly Halloween outfit came to life. I am thrilled and luckily, he doesn't mind it to much either.

Hop over to Hideous! Dreadful! Stinky! to see a guest post I did where I showed a simple way of making the leggings for this costume out of a t-shirt. Also, stayed tuned for two more woodland-themed costumes! Hot dog!


Visit thecsiproject.com

Monday, October 17, 2011

My Round Little Pumpkin Costume

My sister was incredibly thoughtful to have snapped some photos of my little man in his costume. They still warm my heart every time I look at them.
Of all of the costumes that I have made, this round little pumpkin may very well be my favorite! Everything from the plump little cap to the striped suit underneath made my heart go pitter-pat. As luck would have it, my little boy started walking just the month before Halloween so I got to watch him toddle around in all of his glory! And best of all, I didn't have to worry about him hurting himself as he tripped around since the whole costume was one big puffball.


Thursday, September 8, 2011

Tea Staining Fabric {tutorial}

Last month I was contacted by Courtney (from the blog, A Little Glass Box) who wanted to see if I could make her a clown costume with a very vintage feel. She had her heart set on striped and polka-dotted combination of black and an aged looking-white and was wondering if I could do some tea staining to get the look she was wanting. Even though I had not done any tea staining before, I was ready and excited for the challenge!

Here is what I learned about tea staining:

After I looked all over the web for tutorials, I found that nearly every one said different things about how to tea stain, however, they each made it clear that I needed to be careful in selecting what kind of tea I would use for my task. I had never thought about it before, but it made sense that since every type of tea has it's own hue, that they would all stain your fabric different colors. From all the research I did, it was clear that for the type of look I was wanting, I would need black tea since it finishes with a very antique-y look which would be perfect for the vintage feel of Courtney's costume.

Before I jumped it, I decided to test the process on a small piece of my black and white fabric. I strongly recommend this since. I did this by filling one small mason jar with hot water and adding two bags of tea. Thankfully, it worked just fine so I moved forward.

While I boiled my water on the stove, I took my fabric and soaked it in cold water, to help the stain be more uniform:

Once my water was boiling, I poured it into a medium-sized bucket that I placed in my sink. Since I had over a yard of fabric to stain, I wanted to make sure that I had plenty of room for my fabric to move while I stirred it around (so that it would have a uniform stain). I added more hot water from the tap till I filled the entire bucket. Then I started adding tea bags the mixture looked dark enough (I added about 12 bags of tea to my bucket of water. I read in here that it should be about one bag of tea per cup of water but I found that it didn't need to be that concentrated since the look I was going for was more of a softer creamy white).

Once I got the color I thought I wanted, I pulled the bags out of the water and threw my wet fabric in the mix, stirring constantly. Most of what I read said that I should let it stay in the tea bath for 30-40 mintues, but since I was going for such a light look, I thought that I should stay vigulant and continually check the color of the fabric. I am glad I did because it only took about 6 minutes before I liked what I saw. It should be noted that the color looks darker while it is wet.

My boys found this step very interesting:

After I got my color, I pulled the fabric out of the tea bath and rinsed it on cold with a little bit of dish soap. I then tossed it in the dryer and hoped for the best.

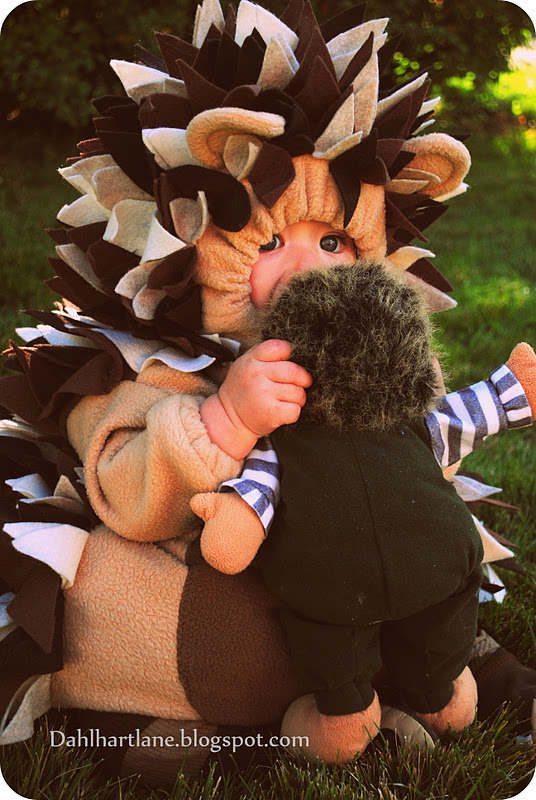
Hot dog! I got the exact color I was hoping for (I was trying to match a black and off white striped fabric that I was going to be using for the costume as well so the stakes were high) and I was filled with relief! Luckily, Courtney liked how the tea staining worked out as well and now her adorable little boy is all set for Halloween.
Courtney sent me this picture of her little man. What a cutie-patootie! By the way, you should check out Courtney's blog, Little Glass Box. She has so many cute ideas over there. I can't wait to try out this one.
Thank you Courtney for taking a leap of faith with me and good luck everyone on any future tea staining projects. I hope this helped!
Linked up to:

Sunday, July 31, 2011

Peacock Costume

Here is another costume that my sister-in-law and I dreamed up. Sadly, her daughter was not in the mood to try it on. What? Who isn't in the mood for Halloween in July?!!! :) Oh well, when she does where it, I'll be tickled pink. Let's just hope it fits!

Wednesday, July 27, 2011

Caterpillar costume

Caterpillar
My husband's family came to stay this last week and we had a wonderful time. Not only did we have fun laughing and playing, but I also got sit down with my sister-in-law and sew. She is also a big lover of Halloween and so for the third year in the row we sat down and made costumes together. Yes, I know it is July, but I start my Halloween prep quite early in this house. :) His sister, Audrey, is due to have a baby boy this September (on my birthday!!!!) and so we got to create a costume that would keep him warm and swaddled as a month old babe.

Audrey thought that a caterpillar costume would be fun and we both thought a version of The Very Hungry Caterpillar would be adorable. By using a 0-3 month old pajama outfit and some bright colored flannel, our little costume came to life. I love designing costumes and I can't wait to see our little nephew in it!


http://tatertotsandjello.blogspot.com/, 
Craftaholics Anonymous

Friday, June 17, 2011

Superheroes made from men's t-shirts

 My oldest little man has taken to all things superhero as of late, but his favorite of all is Batman. For a while now he has been asking me to make him a Batman costume so that he can show the world just how amazing he really is. At first I thought I would pick up some knit fabric at Joanns, but when I realized that even with the fabric 50% off, the costume would still be about $15-$20 dollars to make. Add that to the fact that they didn't even really have the right color of blue that I was looking for, I decided to take my money elsewhere. 

I decided on visiting our local thrift store and came away with a handful of mens extra large t-shirts in hopes of being able to refashion them into the dream outfit for our big boy. Thankfully, it worked as planned and we now have a Batman zooming around the house as happy as a clam! He really thinks that with his mask in place, nobody can tell who he is and is sure that he has all of the abilities as the real Batman. In fact, yesterday I watched him try to fly off the couch. Yowsers.

Since we have another little fella who wants to be JUST like his older brother, I decided on making a second costume for our little sidekick. My heart melts every time I see Robin zipping around in his little yellow cape!

 Our little Robin isn't so fond of the camera. 
These little costumes are so easy to make and are so affordable! Each costume took three X-Large shirts that I found at the thrift store for $1 each, making them only $3 dollars total. Each costume only took me about an hour to make so our superheros were ready to play in no time!
Here is a really lame tutorial on what I did:

Buy X-large mens t-shirts in your needed colors.
 Take clothes (in my case, I used pajamas) that they currently wear and turn inside out and place on shirts. When possible, take advantage of the finished edges already there on the shirt. Besides that, I decided to take advantage of the knit material and left the cape edges raw since they weren't going to fray. Cut each piece out and sew together. For the details I cut out shapes and zigzag stitched them in place on the costume. 
 For a more finished look, I used the collar from the shirts by cutting them out and sewing them to the neckline of the new superhero shirts.
Before you know it, you have the cutest crime-fighters in town!
Having boys is so much fun.
Pink Hippo Party


LinkWithin

Related Posts Plugin for WordPress, Blogger...