Showing posts with label Refashion. Show all posts

Saturday, November 19, 2011

Bow Ties made out of Felted Wool Sweaters (Tutorial)

After finishing the Cashmere Neck Tie for my son, I started thinking of different things I could make with felted sweaters. Since I am taking part in a week all about bows over at Simply Homemade in the next little while, my next obvious choice was to make bow ties. I must say, I am absolutely smitten by these chunky little ties. And the fact that you can easily make one in five minutes makes them all the better!
Before cutting out your shapes, you need to wash your wool sweater and dry it. This makes it felt and it also becomes thicker so it holds it's shape wonderfully well. I got my sweater at our local thrift store but this could be a great project for an accidently shrunken and sweater done in a laundry mishap.
After you sweater is ready, cut your pieces. Because of the nature of felted wool, you don't have to worry about fraying so you don't have to cut any extra seam allowance to turn under. Just cut it the size and shape you think will look nice! As you can see, my shapes are two curved rectangles about 3 1/2x2 inches, a strip for the collar that is about 14 inches long and another small strip for the bow.

Take your two rectangle shapes and stack on each other. Tread your needle and push it through the center of both shapes.

Pull tight to gather.

With the needle still in your hand, wrap it tightly around the center several times.

Place the bow on top of the center of the collar strip. Push needle through both

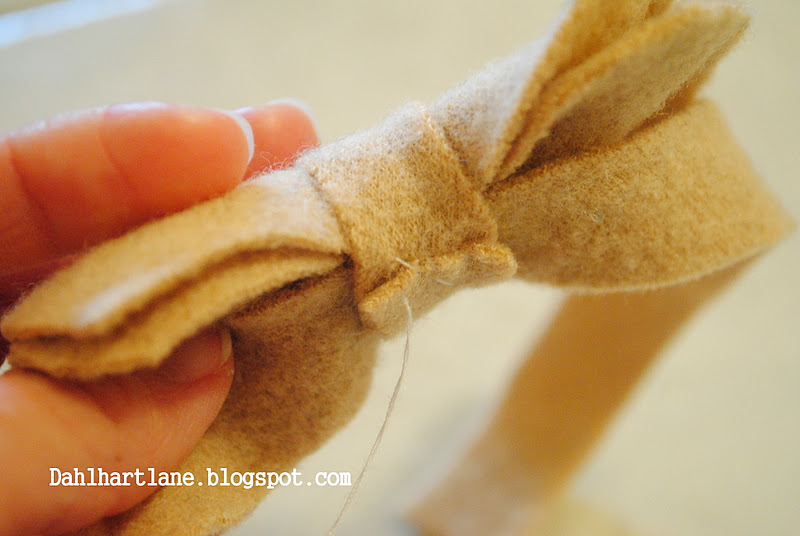
Put the last little strip on the center of the bow and wrap it around both the bow and the collar. My strip is longer than it needs to be so that it is easier to work with. I just trim what I don't want after it is in place.

pull it tight and sew it shut. If you are like me, cut off the extra length.
Sew your velcro to the ends of the collar and you're all done! See what I mean? So easy and so fun.

In a matter of minutes, you can have a handful of handsome bow ties to dress your little chap in all Winter long!

Thursday, November 17, 2011

Little Boy Cashmere Neck Tie (Tutorial)

With the holiday season right around the corner, who doesn't need a new neck tie for their little man to help wow family and friends at your next gathering? I recently saw a picture (or at least I am pretty sure I did. I can't find it anywhere to save my life) of a cashmere necktie in an Anthropologie magazine and was smitten. But spending an arm and a leg for my four-year-old to look dapper wasn't going to happen this year (or probably ever). Fortunately, I remembered that I had scraps of a cashmere sweater laying around and decided at once to make my own version in a little boy's tie. I am so glad I did because he is incredibly charming in his knew neck tie.

The tie is very easy to make and very  affordable. First off, hit the nearest thrift store and buy a cashmere sweater (usually a couple bucks). Wash and dry your sweater so that it felts slightly so that it doesn't fray. Then cut your tie out. My scrap piece wasn't long enough so I had to make two pieces and sew them together in the middle. The entire length was about 28 inches long. Make ends come to a side point. Cut matching pieces of lightweight interfacing and iron on to the back.

Sew flat ends together to make the body of your tie.

Next, fold over the edge of the bottom of your point and iron flat.

Fold end up, making a point. Iron flat. Repeat on skinny end of tie.

Fold over sides of the body of the tie till they are touching in the middle. Iron flat again. Then stitch up the center.

 Hand stitch end closed.

Set body of tie aside and cut out a strip of about 3 1/2x16. Cut matching piece of interface and iron on back.

Fold in half with right-side facing in and sew up the long end.

Turn right-side-out (with the help of a knitting needle or pencil and iron flat with the seam down the center.

Fold in ends and sew shut. Sew on your fastener of choice. I am a velcro lover so that is what I used.

It should look like this from the back. 

With collar closed, do the following:

 Then:
All done! Now your little man is set to impress! 
 What I like most about making ties like this is that they are adjustable in every single way. When my son grows bigger, or if I want one of his younger brothers to wear it, all I have to do is untie the knot, reajust it, and tie it again. I hope you like it as much as I do!

Tuesday, July 5, 2011

Recovering our jogging stroller

Our poor double jogging stroller had been slowly going the way of all the earth until I finally couldn't stand it any more. It had been given to us used but since we use it so much, it was starting to fall apart. The frame was  in perfect condition and since we aren't ready to pay for our dream B.O.B stroller quite yet, I thought it would be a cinch to upgrade it myself. Boy was I wrong. I loathed this project from start to finish. However, if I am going to be completely honest, it was mostly because it was standing in the way of other more fun projects that I was wanting to get started on.
Before:

First off, I took the fabric seats off of the frame. This just took a screwdriver to do and was off in no time. Then I sweet-talked my honeybun into taking off all of the straps (I'm cheap and didn't want to buy new ones since they were still great). What a man!
I then laid the seats out on the indoor/outdoor fabric that I bought (for over 50% off at Joann's) and started cutting my fabric in the same shapes but giving myself a little extra for seam allowance. 
Once that was all done, I used the old cover as a guide to show me where to sew and where to place all of the straps. Good times.... This is where I wanted to jump ship. It wasn't hard, really. Just time consuming.....
...especially with my helpers at my side. :)
Wow, I sure look fancy when I work!
But in the end, it worked and we are back in action again! Hot dog! 
My men, trying the recovered stroller on for size.
Now that I have done it, here are some suggestions that might help any other daring soul get through their stroller revamping a little more easily:

  1. Using patterned fabric means that you will have to buy twice as much and takes twice as much work. Duh. How long have I been sewing for? I don't know why that didn't cross my mind when I bought the fabric. I was just thinking of how cute and unique our stroller would be with a print. Next time I would do a solid color because the pattern was only printed on one side.
  2. Take apart the ENTIRE thing. Don't just eyeball the pattern of the seats, etc. in hopes of getting your end result to look the same. Even though I basically pulled it off, I wish I did't get lazy at this step because it would have been more exact. 
  3. Make sure you take plenty of pictures of your stroller before you take it off of the frame and before you take it apart. This way you won't have to guess how to put things back in place later.....I still have several screws that I have no idea what to do with.
  4. The heavy duty rope/bias tape/whatever it is called (I found it in the ribbon section of Joann's) that you use on the edges is your best friend. Use it on every seam possible the first time round. I thought that certain areas wouldn't need it so I either had to sew them twice or take them apart and start again. It is especially handy if you choose to go with a pattern like I did and have to use two pieces of fabric. With the binding, you don't have to sew it and then turn it right-side-out. Just face the fabric the way you want it to be in the end and sew the binding around the edges. Much faster.

Anyway, good luck if you ever decide to go this route! In the end I am glad I did it, but during the project I was reminded why some people don't like sewing.


LinkWithin

Related Posts Plugin for WordPress, Blogger...