Showing posts with label Thanksgiving. Show all posts

Monday, November 21, 2011

Felt Pilgrim Hats

Last Friday I got to be a creative guest over at Eighteen25. They were so kind and it was a real treat to be a part of one of my very favorite blogs for the day! In case anyone has a little extra time before Thanksgiving, here is the idea I shared over there: 

My husband says that making my youngest wear this little girl pilgrim's hat is child abuse. Obviously I need to have a girl one of these days.
Last Thanksgiving I noticed that Pottery Barn had adorable little Pilgrim hats for sale. At the time I was on bed rest with our youngest little man, so I vowed to make some at a later time. This year we are excited to get to dine with the majority of our cousins on my side of the family. Since this might be the last time in a while that we get to all be together for this holiday, I wanted to make it special and decided that Pilgrim hats were a must! They are easy as pie and bring such a festive spirit to this great holiday. And best of all, since they are made with felt, they can be used for years to come.
Little Girl Pilgrim Bonnet:
This little hat is especially easy to make. All you need is a 12x19 inch piece of white felt and some ribbon. It can be done with a hot glue gun, but I sewed it up quickly on my sewing machine. 
Make sure to leave a couple inches open at the folded edge.
Open hat up so that it makes sort of a triangle.
Turn hat right side out and fold front edge back about 2 inches. Place end of ribbon under the fold and stitch into place and your done! Now your little miss can enjoy her Thanksgiving feast in style!

Unfortunatly, it seemed that even my youngest could sense that this bonnet wasn't too many and I could catch a good picture of it to save my life! Very frustrating but I guess I really can't blame them.


Little Boy Pilgrim Hat
This hat takes a little more work than the bonnet, but it is still simple and if your little men love it as much as mine do, than it will be worth it.
Cut out your felt. The body of my hat is 8 1/2 inches tall and 12 inches wide (you need 2). In brown, the headband is a strip of 23x4 inches out of brown and then another little strip of 1 1/2x 6 1/2 for the belt on the hat. Lastly, the little yellow buckle is made by cutting a 2 1/2 square and then cutting out the middle.

Next, take your brown headband and fold in half. Sew along the long edge and then turn right-side-out.
I use a knitting needle to help turn out my fabric.

Pin headband to one of the hat pieces. Sew it in place but be sure to not sew it all the way to the edges of your hat. This helps it to hold it's shape when it is all done.

When you are done, fold both ends of the headband inward.

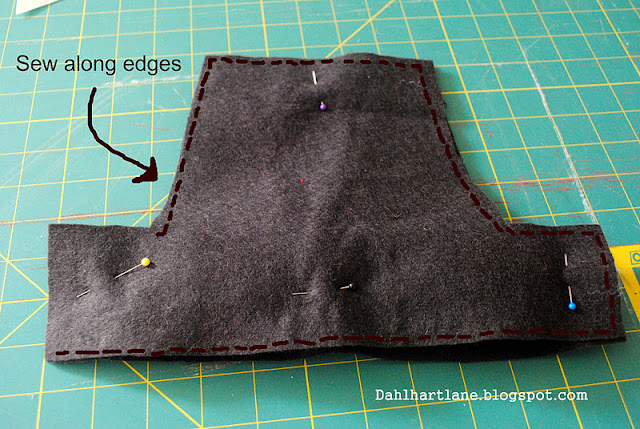
Place other piece of hat on top. Pin in place and sew along the edges, leaving a corner open so that you can turn it right-side-out.


Once right-side-out, stitch your opening closed.

Place second brown strip on hat and sew.

Place buckle on brown band and sew into place.

Fold in ends and sew shut. 

Sew velcro onto the ends of your headband and your done!

Now your little men can have all the right accessories to gobble down their turkey dinner!
Happy Thanksgiving!
My youngest likes his manly pilgrim hat much better than the bonnet.

Tuesday, November 8, 2011

Turkey Hands

Ever since my oldest son was born, we had a Thanksgiving tradition of tracing our children's hands every year for Thanksgiving and writing on the feathers and neck the five favorite things that they are (or would probably say if they could talk at the time) thankful for. I love this tradition because not only does it bring a spirit of thanksgiving and it's easy, but it also is a nice way to a record the things that they loved while their hands were  so small. My oldest is now four and I am amazed at how quickly his little hand print turkey has grown already! This year, I decided to take it a step further and put my three son's turkey's in a frame to decorate our home with. As I was getting this post ready, I was surprised to see that one of my favorite blogs, Eighteen25, posted a similar idea. I love how theirs turned out and I'm glad to see that I am in good company! This is how I made my turkey hand print art.

After I helped the boys sketch around their, we colored them in and then wrote on each one the five top things in their life at this time. I then cut them out and set them aside while I got the rest of the project ready. I wanted to have the word, Thankful, as part of the framed piece but since I didn't win a Silhouette machine during this last round of giveaways all over blogland (poor baby me), I decided to use the old fashioned method of Freezer paper and paint. Normally I only do this when I am trying to make a custom t-shirt (like here and here) but luckily it worked! I typed out the word in a font that I liked on my computer (this time on picasa but I regularly scan the internet for free fonts that I like) and then used the computer screen to help trace the word on a piece of freezer paper with a pencil. Then I used an x-acto knife to carefully cut out each letter.
Be sure to only cut on some sort of cutting board or cardboard and also be sure to keep the center shapes from letters (like "a" and "o", etc.) that you will need later.

I decided to use watercolor paper for this project. After placing the freezer paper in the exact spot I wanted, I ironed it on my paper (with the shiny side of the freezer paper facing down) with my iron on the cotton setting and no steam. I then added the center of the letter A back into place and ironed that.

Once I got that done (although I obviously didn't iron down the beginning of my word too great) I used a paintbrush to lightly paint over my stencil. I used a very cheep and watery paint but I would recommend a thicker craft paint so that it doesn't run like mine did.

After it dried for a moment, I peeled back the freezer paper:
(The heavy paper made it so it didn't rip when the freezer paper pulled off)

Ta-da!

I then got my turkey hands and added a little tape to the back....

...and stuck them into place! 

I stuck my turkey's in a frame and plopped them in my kitchen where I have been enjoying them ever since! Not only does it decorate my kitchen, but it also is a wonderful reminder of three of my greatest blessings of all.

Friday, November 4, 2011

How to make a Giant Pumpkin

 Several years ago, I found a tutorial on how to make giant-sized jack-o-lanterns on a website called, Stolloween. Since I was enchanted with the huge pumpkins outside of Hagrid's cottage on Harry Potter, I knew that I had to try my hand at making my own jumbo pumpkin at some point. This October, I spotted a large fake pumpkin at Hobby Lobby for about $140.00 and was so shocked at the steep price that I went straight home and started figuring my own out. In the end, my pumpkin did not end up being as big as I wanted (which is probably a good thing since I really don't know how I am going to store it) but I still got a kick out of making something this large. Whether you are wanting to make a lasting decoration or a seasonal photo prop, hopefully this tutorial helps!

This is how I made it:
 I got the largest trash bag I could find and stuffed it full with newspaper, plastic bags and pages from magazines.

Then I knotted it up:

Next I used masking tape around the sides to create the ridges:

Once the general shape I wanted was formed, I used my paper mache paste recipe and added several layers of newspaper strips over the form. After I had as many layers as I wanted, I let it dry in the sun with a heavy can set in the center to help it keep its pumpkin form:
 (And I might add, what a fitting can to use for this project)

After it dried, I decided the ridges on my pumpkin were not as big as I wanted, so I crumpled up more newspaper and magazine pages, covered them with paste, and added them to the pumpkin:

After each crumpled up pasty piece was added, I glued it down with a strip of pasty newspaper so that it would hold in place. I did this until the entire pumpkin looked the way I liked.


Once all of my additions had dried, I mixed up paper clay and applied it in a thick layer over the top 3/4ths of the form:

Once it was hard/dry enough (several days later), I tipped it upside down on an empty bucket (so the stem wouldn't break) and cut a hole at the bottom...

...and took out all of the newspaper stuffing. This way it would be lighter and also would be able to dry at a faster rate:

Since all of the paper clay was so heavy, it sort of flattened the bottom of my pumpkin. To fix this, I cris-crossed the opening with more tape (so that my additions wouldn't fall inside) and added more crumpled pieces of newspaper and put more paper mache over them. After that, I added more paper clay to the bottom half of the pumpkin:

 Once that all dried fully, I sanded down my pumpkin and then painted it orange. I decided to use a sample-sized can of Gliddens Pumpkin Patch Orange from The Home Depot (since it is so inexpensive).  I finished by  using brown and green craft paint for the stem:

After my paint dried, I covered it with a marine/indoor/outdoor varnish like Jackie Hall suggested on The Paper Mache Recourse so that it would be able to withstand the elements on my front porch.

Now that it is starting to frost outside, many of our pumpkins have already turned to mush. However, our great big paper mache pumpkin is holding it's own and keeping our front porch festive despite the November chill! It was well worth the adventure.
Visit thecsiproject.com

Thursday, November 27, 2008

Thanksgiving Turkey

I made this little guy the old fashioned way with a balloon, newspaper, and paste. I had a ball trying out new things!


Posted by Picasa

LinkWithin

Related Posts Plugin for WordPress, Blogger...