Showing posts with label Tutorials. Show all posts

Wednesday, December 14, 2011

Faux Union Suit Tutorial

Sorry that it has taken me so long to get this tutorial up for you! After losing all of my pictures from the first three I made, I sort of was dragging my feet until I thought about making a pair for my little three-month-old nephew. I now have made these pajamas in size 3-6 months, 6-12 months, 2T, and 4T. If anyone wants to help me figure out how to do a pdf pattern, I would be happy to share my patterns with whoever is interested but until then, this step by step tutorial will have to do. 

I was lucky enough to have a couple knit footed pajamas around the house already to use as a basic pattern. If you have a snug fitting pair already, just turn it inside out and place on your fabric and cut out your pattern pieces. The size that I didn't have around, I used a top and bottom set and measured the torso length to make sure it would fit the same. 
After cutting out your pieces, they will look like this:

Besides your fabric, you will need these:

The zipper I used on my last one was much too short. I suggest using zippers from 18-28 inches long.

Start with your long strip of fabric. This will be used as the trim for the neck and cuffs on the arms.


Then...
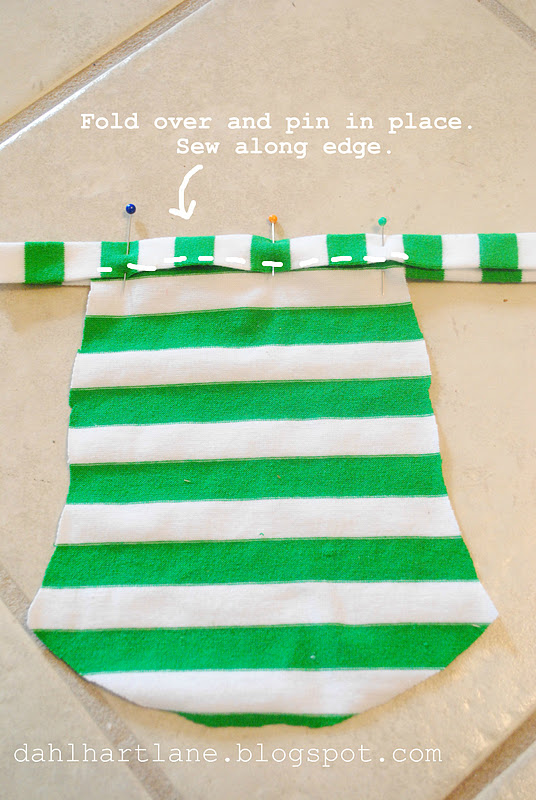
Set the sleeves aside and work on the main body. Be sure to line up the stripes when sewing your pieces together.


Place the flap about an inch up from the crotch and pin in place.
If you look closely, you can see that I sewed the closed edge to the body. Rats. I hate picking out seems on knit fabric.


Sew up the right leg.
Now put in your zipper. I have a zipper foot that made it easy to sew on.
Because my zipper was so short, it wasn't long enough to extend down the leg. But if you can get a long one, make sure that as the zipper goes down from the chest to the left leg, that you have it run along the last edge of the diamond piece in the crotch.

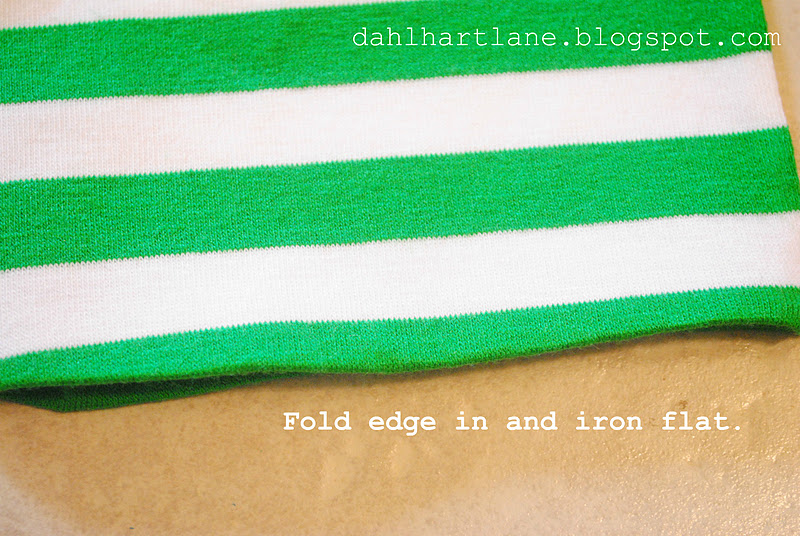
With ends folded in, sew on the neck:

My machine sews button holes (ignore the spelling error in the picture below) for me. All I had to do was mark where I wanted them, adjust my machine, and sew them in. I am totally spoiled. I hope you are, too.

Next are the feet. I am not going to lie, I HATED sewing these in. All four times. If you want to skip this part, just put more trim around the ankles and call it good. If you want the footed look, here is what I did:


Last but not least, sew on your buttons....
....Secure your flap....
and you're done! Hot dog! Now your little ones can stay warm and toasty all winter long! For more pictures, click here.

Friday, November 4, 2011

How to make a Giant Pumpkin

 Several years ago, I found a tutorial on how to make giant-sized jack-o-lanterns on a website called, Stolloween. Since I was enchanted with the huge pumpkins outside of Hagrid's cottage on Harry Potter, I knew that I had to try my hand at making my own jumbo pumpkin at some point. This October, I spotted a large fake pumpkin at Hobby Lobby for about $140.00 and was so shocked at the steep price that I went straight home and started figuring my own out. In the end, my pumpkin did not end up being as big as I wanted (which is probably a good thing since I really don't know how I am going to store it) but I still got a kick out of making something this large. Whether you are wanting to make a lasting decoration or a seasonal photo prop, hopefully this tutorial helps!

This is how I made it:
 I got the largest trash bag I could find and stuffed it full with newspaper, plastic bags and pages from magazines.

Then I knotted it up:

Next I used masking tape around the sides to create the ridges:

Once the general shape I wanted was formed, I used my paper mache paste recipe and added several layers of newspaper strips over the form. After I had as many layers as I wanted, I let it dry in the sun with a heavy can set in the center to help it keep its pumpkin form:
 (And I might add, what a fitting can to use for this project)

After it dried, I decided the ridges on my pumpkin were not as big as I wanted, so I crumpled up more newspaper and magazine pages, covered them with paste, and added them to the pumpkin:

After each crumpled up pasty piece was added, I glued it down with a strip of pasty newspaper so that it would hold in place. I did this until the entire pumpkin looked the way I liked.


Once all of my additions had dried, I mixed up paper clay and applied it in a thick layer over the top 3/4ths of the form:

Once it was hard/dry enough (several days later), I tipped it upside down on an empty bucket (so the stem wouldn't break) and cut a hole at the bottom...

...and took out all of the newspaper stuffing. This way it would be lighter and also would be able to dry at a faster rate:

Since all of the paper clay was so heavy, it sort of flattened the bottom of my pumpkin. To fix this, I cris-crossed the opening with more tape (so that my additions wouldn't fall inside) and added more crumpled pieces of newspaper and put more paper mache over them. After that, I added more paper clay to the bottom half of the pumpkin:

 Once that all dried fully, I sanded down my pumpkin and then painted it orange. I decided to use a sample-sized can of Gliddens Pumpkin Patch Orange from The Home Depot (since it is so inexpensive).  I finished by  using brown and green craft paint for the stem:

After my paint dried, I covered it with a marine/indoor/outdoor varnish like Jackie Hall suggested on The Paper Mache Recourse so that it would be able to withstand the elements on my front porch.

Now that it is starting to frost outside, many of our pumpkins have already turned to mush. However, our great big paper mache pumpkin is holding it's own and keeping our front porch festive despite the November chill! It was well worth the adventure.
Visit thecsiproject.com

Saturday, October 22, 2011

Some tips on dying fabric

In case you are wondering, this is part of the headpiece of my son's fox costume
I am almost done with my last costume of the year and I am pleased as punch (besides the frustration of having to go back and fix a major mistake. D'oh!)! My last costume is for my four-year-old son who wanted/agreed to be a fox to fit in with our woodland theme. I was having some major issues trying to find the right color of fabric for my little man's fox so I finally decided to dye some flannel myself. For some reason, even though I paint and am quite familiar with mixing colors, it didn't really occur to me to come up with my own color since fabric dye is so unforgiving. Since I didn't see any fabric dye in the stores that fit my fancy, I hopped on Rit Dye's website and saw that they offer recipes for nearly any color you could want! Hot dog! In case anyone else is working on a project that needs a custom color, here is what I learned:

Go to Rit's website (I haven't checked if any other dye company does this too) and the Colorit Color Formula Guide at the top of the page:

Once there, go down to the bottom of the page and click on the basic color family you are looking for. In my case, it was orange.

When you see a color that you like, click on it and they tell you exactly what dye to buy and how to mix it. I imagine that once you get the idea of your recipe, you can use any brand that has the same basic colors.

Once you get your colors, get your fabric wet with cold water and wring excess water out. From there, I follow the basic guide that Dana gives on her blog, Made of dying your fabric in your sink instead of over the stove. However, I like to start off by boiling water in a large pot and then pouring it into a large bucket or basin in your sink. Add more hot water (as hot as it comes out of your tap) to fill the rest of your basin. Add your colors and mix well.
Add your fabric and mix every ten or so minutes until you get the color you want (in my case, I did it twice because once my fabric dried, it wasn't quite as dark as I wanted the first time). If you are wanting a light color, stick around 'cause the color will finish rather quickly, but if you want something dark, you have time to get other things done while it soaks. Because I was wanting a more muted tone, I only had to dye it for about thirty minutes.

When you get the color you like, take it out, rinse it and pop it in the washer to get out the extra dye. After it dries, you are ready for your project to move forward! Good luck!

****I'll be sharing my son's fox costume next in a couple days. Wish me luck on the finishing touches!
Linked to: Sew Much Ado

Friday, October 7, 2011

Jack-o-Lantern Totes

Picture taken by my talented sister, Aria

Several years ago I was smitten with all things vintage where Halloween is concerned. I found the cutest vintage-looking fabric for my son's clown costume and knew that he needed a tote with the same vintage-charm. I knew that back in the day, jack-o-lanterns were made with paper mache so I figured that I could make some for myself. Thankfully, my planned worked and we have used them ever since. Here is how I make them:
First (and not pictured. Woops), cover a balloon 3/4's of the way up with several layers of strips of newspaper and paper mache paste. Let dry and pop the balloon. Press down your bowl so that the bottom flattens in slightly. Cut top down to the height you want it:

Cover form with about a 1/4 of an inch of paper clay or Celluclay (I like to keep a bowl of water by me so that my hands can stay wet. I find that the clay doesn't stick to me as much like this).

Leave bottom basically uncovered:

Add extra clay around the rim so that it is a little thicker:

Flatten rim with your finger so that it is even:

With your wet fingers, carve out your jack-o-lantern's face features by pushing the clay off to the side or removing it completely.

Carve pumpkin ridge lines every so many inches around your jack-o-lantern by pressing finger down at the forms base and pulling upwards:

If there are any lines or edges that need smoothing, wet your hands and softly smooth the clay out. When done, let dry in the sun (or in your oven on warm).

When dry, paint however you please:
 (I like to use a mix of Americana Tangerine and Jack-o-lantern orange acrylic pain)

When your paint is dry, slightly dilute a small amount of black paint and lightly wipe on your jack-o-lantern (I suggest starting in the back so that you can make any learning mistakes there where it won't be as noticed) in small sections at a time. Then wipe the area down with a damp cloth until you get enough of the antique look that you like:

 After spraying your pumpkin with a finish (like this. I like mine glossy because I think it looks nice) to keep it safe from the elements, drill two holes near the top on opposite edges for the wire. Then decide how long you want your wire chain (I buy my wire at Home Depot in a big roll for about $3) and cut a piece twice that length. Fold in half and twist all the way down.

To attach chain, (1) take sharp end and thread through one whole going from the inside out. (2) Pull chain through until the other end of the chain catches on the inside. (3) Continue to pull chain up and over until you thread it through the opposite hole going from the outside in:

Bend the sharp tip in towards itself so that it creates a loop and holds in place.

Tah-dah! All done! Now you are ready for your trick-or-treater to collect as much loot as they please on Halloween night! I hope this tutorial was helpful! Have a wonderful Halloween!
Visit thecsiproject.com

LinkWithin

Related Posts Plugin for WordPress, Blogger...