Showing posts with label Sewing. Show all posts

Wednesday, December 14, 2011

Faux Union Suit Tutorial

Sorry that it has taken me so long to get this tutorial up for you! After losing all of my pictures from the first three I made, I sort of was dragging my feet until I thought about making a pair for my little three-month-old nephew. I now have made these pajamas in size 3-6 months, 6-12 months, 2T, and 4T. If anyone wants to help me figure out how to do a pdf pattern, I would be happy to share my patterns with whoever is interested but until then, this step by step tutorial will have to do. 

I was lucky enough to have a couple knit footed pajamas around the house already to use as a basic pattern. If you have a snug fitting pair already, just turn it inside out and place on your fabric and cut out your pattern pieces. The size that I didn't have around, I used a top and bottom set and measured the torso length to make sure it would fit the same. 
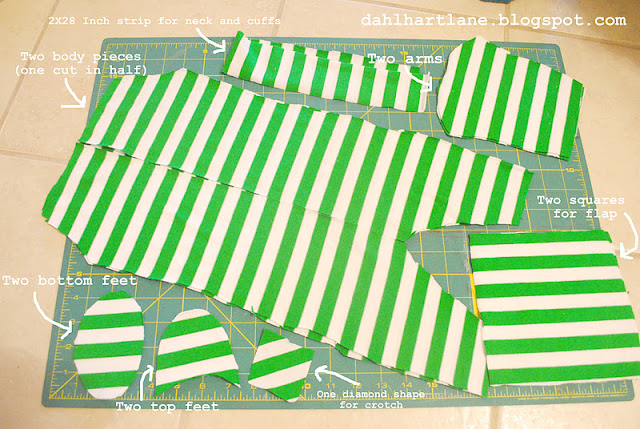
After cutting out your pieces, they will look like this:

Besides your fabric, you will need these:

The zipper I used on my last one was much too short. I suggest using zippers from 18-28 inches long.

Start with your long strip of fabric. This will be used as the trim for the neck and cuffs on the arms.


Then...
Set the sleeves aside and work on the main body. Be sure to line up the stripes when sewing your pieces together.


Place the flap about an inch up from the crotch and pin in place.
If you look closely, you can see that I sewed the closed edge to the body. Rats. I hate picking out seems on knit fabric.


Sew up the right leg.
Now put in your zipper. I have a zipper foot that made it easy to sew on.
Because my zipper was so short, it wasn't long enough to extend down the leg. But if you can get a long one, make sure that as the zipper goes down from the chest to the left leg, that you have it run along the last edge of the diamond piece in the crotch.

With ends folded in, sew on the neck:

My machine sews button holes (ignore the spelling error in the picture below) for me. All I had to do was mark where I wanted them, adjust my machine, and sew them in. I am totally spoiled. I hope you are, too.

Next are the feet. I am not going to lie, I HATED sewing these in. All four times. If you want to skip this part, just put more trim around the ankles and call it good. If you want the footed look, here is what I did:


Last but not least, sew on your buttons....
....Secure your flap....
and you're done! Hot dog! Now your little ones can stay warm and toasty all winter long! For more pictures, click here.

Wednesday, December 7, 2011

Little Boy Bowties

Our family computer bit the dust so my posts are going to be few and far between. However, yesterday I was a guest post over at Simply Homemade as part of her bow series that she is doing. So much fun! Here is the post I shared over there but I recommend heading over to her blog to see her fun ideas as well as the other guest posts.  
Hi, my name is Malinda from Dahlhartlane and I am tickled pink to be here on Amanda's blog today! Since I am a mother of three boys, when Amanda asked me to come up with a tutorial for her bow series the first thing that popped in my head to make were little boy bow ties. Now, I know tutorials on bow ties are all over blog land, but this version is a bit different then the rest and I love it's little double-layered rounded edges.

For these ties, you need to cut out four 3x4 slightly rounded rectangles and one long 2 1/2x 19 inch strip. Of course, you can modify this depending on the size of your child and how big or small you like your bow. You will also need a small strip of velcro (or some other type of clasp).

Take your little rounded rectangle-ish shapes and place them in two pairs with right sides facing in.

Sew each pair around the edges but be sure to leave one inch open in the middle of one side of the base.

Next, fold your long strip of fabric in half and sew along the long edge.

Turn everything right-side-out (I like to do this with a knitting needle) and iron them flat. Take your newly sewn strip of fabric and cut about three inches off and set aside. This little strip will be used to secure your bow in place later.

Take the long strip and turn the ends in by poking your finger into the tube slightly. Sew shut.

Sew on your velcro at the ends of your strip and you collar is complete! Hot dog! Now that aside while you finish your bow.

Now, stack your curved rectangle pieces and push your needle and thread through the centers like this:

Pull tight to gather and then wrap your thread tightly around the center several times.


Place your bow on top of the good side of your collar (the side without the seam running down the middle) and then wrap the extra little strip of fabric around both. Turn ends under.

Stitch it shut and your done!

Hot dog! Now your little man is ready for any holiday party thrown his way!
I started making these bow ties several years ago and haven't been able to stop ever since. Any sort of fabric can be used to get the exact look you are hoping for. In fact, come over to my blog to see how I made similar bow ties out of wool sweaters! Super cozy, amazingly easy, and incredibly cute. Thanks, Amanda, for hosting me today! I hope everyone has a wonderful day and holiday season!

Saturday, December 3, 2011

Faux Union Suit Pajamas

I decided to make matching pajamas for my three little men and I have to say, this might just be my favorite project yet! It helps that my boys like them as much as I do! In fact, my middle son (the one who is never on here because he hates to be photographed) was so taken by his pair that he refused to take them off. As much as I hate hearing him tantrum, I can't say that my ego wasn't stroked a little. :) I took step-by-step photos, but my computer has since died and took my pictures away with it. If enough people are interested, I'll be posting a tutorial, but for now, here are some pictures of my cuties in their little flapped pajamas.
***Post edit: Tutorial is posted here!


LinkWithin

Related Posts Plugin for WordPress, Blogger...